Saturday, February 18, 2023

Alfa Romeo GTV6 Transmission Ratios

Alfa Romeo GTV6 Transaxle

 The Alfa Romeo GTV6 transmission gear ratios have been revised a few times during its production life. Using official factory resource materials, here's a look at the various gear ratios used. Before we do, like many things that concern the GTV6, production changes overlap model years. For example, my car is a 1982 model year but has the 1981 transmission ratios. So don't be surprised if a 1984 car has 1983 gear ratios, etc. Typical Alfa.

When the car debuted in Europe in 1980, the ratios were as follows.

Alfa Romeo GTV6 Transmission Ratios (European and Early US Cars)

ALFA GTV6 EURO AND EARLY US TRANSMISSION GEAR RATIOS

Final Drive: 4.10:1

(gear ratio / overall ger ratio)

1st: 3.50:1 / 14.350:1 

2nd: 1.956:1 / 8.0196:1 

3rd:  1.345:1 / 5.5145:1 

4th:  1.026:1 / 4.2066:1

5th: 0.78:1 / / 3.198:1   

REV. 3.000 1 / 12.3000

European and Early US Spec Alfa Romeo GTV6 Speeds in Gear*

1st   @1000rpm  4.8mph (7.803kmh)               @6300rpm  30.55 mph (49.16 kmh)

2nd  @1000rpm   8.67 mph (13.964 kmh)        @63000rpm  54.66 mph (87.97 kmh)

3rd  @1000rpm    12.63 mph (20.321kmh)       @63000rpm   79.55 mph (128.02 kmh)

4th   @1000rpm    16.55 mph (26.642 kmh)      @6300rpm   104.29 mph (167.85 kmh)

5th   @1000rpm  21.78 mph (35.053 kmh)        @6300rpm 137.22 mph (220.83 kmh)

RPM @ 60 mph in 5th gear: 2755 rpm 


These were the same ratios used in North America when the GTV6 hit our shores in 1981. Some early 1982 GTV6 models also had these ratios until they were replaced by the noticeably taller ones below.

Alfa Romeo GTV6 Transmission Ratios (1982-1983 US Spec)

1982-1983 ALFA GTV6 TRANSMISSION GEAR RATIOS

Final Drive:  3.42:1

1st  3.500: 1 / 11.958:1

 2nd 1.956: 1 / 6.683: 1

3rd  1.258: 1 /4.298 1

4th  0.946: 1 / 3.232: 1

5th  0.780: 1 / 2.665: 1

REV. 3.000 1 / 10.249: 1


1982-83 US Spec Alfa Romeo GTV6 Speeds in Gear**

1st   @1000rpm  5.82 mph (9.37 kmh)              @6300rpm  36.68 mph (59.03 kmh)

2nd  @1000rpm   10.41 mph (16.76 kmh)        @63000rpm  65.61 mph (105.59 kmh)

3rd  @1000rpm    16.20 mph (26.07 kmh)       @63000rpm   102.06 mph (164.24 kmh)

4th   @1000rpm    21.54 mph (34.66 kmh)      @6300rpm   135.68 mph (218.36 kmh)

5th   @1000rpm  26.10 mph (42.00 kmh)        @6300rpm 164.41 mph (264.60 kmh)

RPM @ 60 mph in 5th gear: 2299 rpm

Some feel that these taller ratios took away the "hot-rod" feel of the earlier car. However, the lower rpms at highway speed were welcomed by many who spent a lot of time on the highway. First gear also became more useful. Zero to sixty times were also improved by eliminating the shift out of second gear before sixty miles per hour were reached.

Alfa Romeo GTV6 Interior

Alfa Romeo GTV6 Transmission Ratios (1984-85 US Spec and Other Markets)

These ratios continued until the 1984 model year, when the 1982 tall gear ratios were combined with the original 4:10:1 final drive. This transmission is referred to in Alfa Romeo documentation as the "High-Geared Gearbox/Differential." 

1984-1985 ALFA GTV6 TRANSMISSION GEAR RATIOS

Final Drive: 4.10:1

1st 3.500:1 / 14.350:1 

2nd 1.956:1 / 8.0196:1

3rd 1.258:1 /  5.1578:1

4th 0.946:1 /  3.8786:1 

5th 0.780:1 / 3.198:1 


1984-85 US Spec Alfa Romeo GTV6 Speeds in Gear*

1st   @1000rpm  4.84 mph (7.80 kmh)              @6300rpm  30.53 mph (49.14 kmh)

2nd  @1000rpm   8.67 mph (13.96 kmh)        @63000rpm  54.65 mph (87.95 kmh)

3rd  @1000rpm    13.50 mph (21.73 kmh)       @63000rpm   85.07 mph (136.90 kmh)

4th   @1000rpm    17.95 mph (28.89 kmh)      @6300rpm   113.10 mph (182.01 kmh)

5th   @1000rpm  21.78 mph (35.05 kmh)        @6300rpm 137.21 mph (220.82 kmh)

RPM @ 60 mph in 5th gear: 2755 rpm

Note: These speeds are based on 195 60 R15 tires for comparison sake and not the TRX Metric  200/60 HR365  tires size standard on the 1985 US GTV6.

Interestingly, while most European cars I've heard of stayed with the original 1980 gear ratios, this "High-Geared Gearbox/Differential" is listed in the European Technical Inspection Manual dated from 3/1984. 

1985.5 ALFA GTV6 Isostatic Gear Shift

 Starting about mid-way through the 1985 model year for US cars (Chassis number 10006731 according to Alfa Romeo documentation), Alfa updated the transmission shift linkage for an improved feel. This revised shift linkage is commonly called "Isostatic ." This modification replaced the simple external shift lever at the transmission case with a series of rods and levers. The consensus at the time was that the revised shifter was smoother, easier, and had a more positive feeling than the rather clunky original shifters. However, nearly 40 years later, Isostatic shifter parts are challenging to source. Because of that, some are saying if you have a worn-out shifter, you are better off now with the old-style shifter mechanism. So much for doing the Isostatic upgrade I never got around to doing!

Update 2-21-2023

I see the Alfa Romeo European Workshop Manual showing 1985 and later European GTV6 models as having the ratios listed below. I invite our European friends to post a comment and let us know what ratios they have in their cars.

Alfa Romeo GTV6 Transmission Ratios (1986 US Spec and late 1985 European Version)

The gear ratios were revised again in 1986. The 4.10:1 final drive was retained, but the first three gears were modified. This close ratio gearbox had less of a gear spread, which is intended to keep the engine in its powerband while accelerating. Now the first four gears were closer without the significant speed gaps of the 84-85 transmission. First gear also returned to being a more useful gear ratio, which many people welcomed. 

1986 ALFA GTV6 TRANSMISSION GEAR RATIOS

Final Drive: 4.10:1

1st 2.875: 1 / 11.787:1

2nd 1.720: 1 / 7.052:1

3rd 1.226 1 / 5.027:1

4th 0.946 1 / 3.879:1

5th 0.780:1 / 3.198:1

REV.  3.000 1 / 12.300:1


1986 US Spec and late 1985 European Version Alfa Romeo GTV6 Speeds in Gear*

1st   @1000rpm  6.00 mph (9.646 kmh)              @6300rpm  37.76 mph (60.770 kmh)

2nd  @1000rpm   10.01 mph (16.123 kmh)        @63000rpm  63.12 mph (101.575 kmh)

3rd  @1000rpm    14.05 mph (22.620 kmh)       @63000rpm   88.55 mph (142.506 kmh)

4th   @1000rpm    18.21 mph (29.315 kmh)      @6300rpm   114.76 mph (184.685 kmh)

5th   @1000rpm  22.08 mph (35.553 kmh)        @6300rpm 139.18 mph (223.984 kmh)

RPM @ 60 mph in 5th gear: 2716 rpm

Update 2-19-2023:

I have found official speeds in gear@1000 rpm and have updated the 1986 numbers. Previously they were calculated.

Let us know if you have more information to share by leaving a comment.  Thanks for reading!

----------------------------------------------

Sources: 

Alfa Romeo Inspection Specifications publications dated 10/1981, 2/1981, 3/1984, 

Alfa Romeo GTV6 Owners Manuals: 1981 through 1986

Alfa GTV6 Spare Parts Catalog, USA edition 0060495165, 9-1989

Alfa Romeo Workshop Manual  PA36090+ 9/84

*Official km/h @ 1000 RPM speeds in gear provided by factory. Converted to mph for convenience.

**Approximate speeds in gear calculated. Factory tire size value used. Rolling radius of tires, among other variables, affects speed. Speeds are rounded for convenience.


Friday, February 3, 2023

Alfa GTV6 Thermostat Replacement

Alfa GTV6 Thermostat Assembly


  A vital part of the Alfa Romeo GTV6's cooling system is its thermostat. Luckily, the GTV6's thermostat is easily accessible on the top front of the engine and can be removed without draining much of the cooling systems. The thermostat comes complete with the housing. If the whole unit is unavailable, people have replaced just the thermostat insert, but that requires modifying the housing. 

A new thermostat assembly does not come with the coolant bleed screw, so make sure you can reuse your old bleed screw off of your old one. If not, order a new bleed screw. In addition, you should also order two new thermostat gaskets (upper and lower) and a bleed screw sealing washer. 

Alfa Romeo GTV6 Thermostat Temperature Specs

  • Initial opening: 180-185°F (81-85°C)
  • Fully open: 200°F (95°C)

Alfa Romeo GTV6 Thermostat Part Number

  • 60558491

Alfa Romeo GTV6 Thermostat Gasket Part Number

  • 60507415 Upper Gasket
  • 60777088 Lower Gasket

Alfa Romeo GTV6 Cooling System Bleed Screw Part Number

  • 60506832

Alfa Romeo GTV6 Cooling System Bleed Screw Washer Part Number

  • 60800596

Alfa Romeo GTV6 Cooling System Capacity

  • 3.2 Gallons
  • 12 Liters


Alfa GTV6Thermostat
Comparison of my original thermostat and the current thermostat being sold at many vendors now.  Make sure you check if the bleed screw on your original can be removed and is not stripped or seized. If it is, you'll need to order a new bleed screw when you order your thermostat. 


GTV6Thermostat
A paper gasket seals the thermostat.  Note the hole at 10:00 is the bleeder passage.  It is important to bleed all the air out of a GTV6 cooling system if you want trouble free operation and a cool running car.


GTV6 Lower Radiator Hose
You can drain the coolant out by removing the lower hose connections or...

GTV6 Radiator Drain Plug
...by removing the radiator drain cock on the lower left side of the radiator.


ALFA ROMEO GTV6 THERMOSTAT REMOVAL


1. Make sure you can loosen the cooling system bleed screw. If this strips or can't be removed,  you will have to buy a new thermostat. 

2. Drain and coolant down below the lower edge of the thermostat housing.

3. Disconnect the upper radiator hose.

4. Unscrew the three securing screws of the thermostat, then remove it with the gasket and bracket.
Take care not to detach the lower gasket between the thermostat intermediate spacer and lower radiator hose adapter. In case you do, that is why you order the upper and lower thermostat gaskets.

Alfa GTV6 Thermostat Hoses
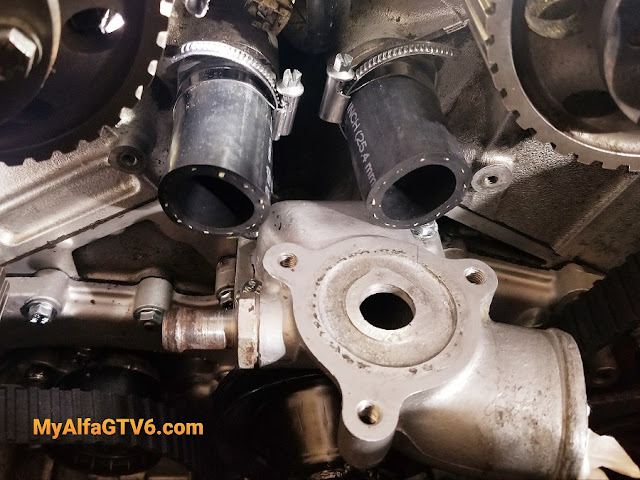
The intermediate spacer is sandwiched between the lower radiator hose adapter and the thermostat. When you remove the bolts that hold down the thermostat, the spacer can come loose if you are not careful. This will likely happen if you do any prying on the thermostat to remove it.  You should replace the two return hoses shown above anyway.


Now is an excellent time to inspect all your hoses if you haven't done that beforehand.

Spend extra attention on the two hoses attached to the thermostat intermediate spacer. This would be the time to change them. 

If you decide to change anything more than the thermostat, remember to drain the cooling system down. You need to take care not to spill anti-freeze on the timing belt if you are not changing it.

CAUTION:
Take care not to detach the lower gasket between the thermostat intermediate spacer and lower hose adapter.

Alfa GTV6 intermediate spacer
The thermostat sits on top of this intermediate spacer. This spacer sits on on top of the lower radiator hose adapter below.


Alfa GTV6 Lower Hose Adapter
This is the lower radiator hose adapter that the intermediate spacer is attached to. The screws that hold the thermostat and spacer screw into this adapter. This hose adapter is bolted to the top of the water pump (see below).

Alfa GTV6 Water Pump
The lower radiator hose adapter is bolted to the top of the GTV6's water pump.

ALFA ROMEO GTV6 THERMOSTAT CHECKS AND INSPECTIONS


Most people just replace a suspected thermostat, but as parts for these cars are not falling off the shelves of local parts houses, it makes some sense to test the thermostat to see if it is bad.

You can check the thermostat by suspending it in a pan of hot water, using a thermometer, and observing the thermostat. Note you shouldn't let the thermostat lay on the bottom of the pan as that can yield inaccurate temperature results.

The thermostat opens when the coolant temperature is between 81 to 85°C (177.8 to 185°F).

The thermostat opens fully when the coolant temperature reaches 95°C (203°F). You should also check the opening movement is greater or equal to 7.5 mm (0.295 in). If none of this checks out, you should replace the thermostat. 


Ever notice that Japanese motorcycles and cars don't leak? Using a premium sealant like the one above will help. This Toyota sealant is called FIPG 103 (Form In Place Gasket) and is manufactured by ThreeBond. You can use it as a gasket maker as well as a gasket sealant.  Toyota FIPG 103/ ThreeBond TB 1207b are the same stuff. ThreeBond also makes Hondabond and Yamabond.


Alfa GTV6 Thermostat Bolt

The Alfa GTV6 Thermostat Bolt.  My GTV6's thermostat was held down by three  7x55mm bolts (measure yours as I've heard some have reported different sizes).  I replace all worn-out cooling system fasteners with fresh ones. Galvanic corrosion caused by dissimilar metals (steel bolt/ aluminum housing) combined with wet coolant can make these bolts a nightmare to remove. You will be glad you used a new bolt with fresh plating and some anti-seize compound the next time you work on your cooling system.


ALFA ROMEO GTV6 THERMOSTAT INSTALLATION


1. Clean the thermostat mounting surfaces. Using a soft scraper and some gasket removal solvent is the safe way. The Alfa's engine is aluminum, and mounting surfaces can be easily gouged and damaged with hard scrapers if you are not careful.

Clean the threads on the bolt and in all the bolt holes. Check to see that the bolts screw in easily. I recommend new mounting bolts if they have any signs of corrosion or deterioration. This is especially important when working on the cooling system, as the bolts can be subject to corrosion. Breaking or stripping bolts can wreck your day.

2. Position the thermostat on the intermediate spacer using a new gasket. I recommend using a high-quality sealant. I use a thin coating (1mm on both sides of the gasket) of Hondabond/ Toyota FIPG 103/ ThreeBonds TB 1207b.

Tighten the three mounting bolts. I recommend anti-seize on these bolts. Remember the coolant temperature switches wire bracket if your car still has one. There are no tightening specs that I could find for these bolts. I use a 1/4-inch drive ratchet, grip it towards the drive end, and tighten it snuggly with one hand. 

 Reconnect the upper radiator hose. Use a new hose clamp.

3. Restore the coolant level.


ALFA ROMEO GTV6 THERMOSTAT INTERMEDIATE SPACER


Sandwiched between the water pump and the thermostat is the intermediate spacer. This spacer has two coolant bypass hoses attached to it that are impossible to change without removing this spacer. It is strongly recommended you change these hoses at every timing belt change (30-40K miles) or at a reasonable time. A thermostat change is also an excellent time to inspect and change these hoses. 

Alfa GTV6 Thermostat Hoses
The Alfa GTV6 thermostat hoses are 25mm / 1 inch inner diameter and approximately 55mm / 2.165 inches long.


These two hoses have a 25mm / 1-inch inner diameter and were initially made from a hose with a reinforced covering. Unfortunately, this reinforced hose is getting challenging to find, and some suppliers have replaced it with a generic, low-grade heater hose. This downgraded hose makes it especially important to inspect these hoses.


When I changed my hoses, my parts supplier was out of the reinforced hose, so I purchased Gates heavy-duty 1-inch heater hose from NAPA. If you elect to go this route, make sure you use heavy-duty hose clamps with this extra thick, reinforced hose.

REFILLING THE ALFA ROMEO GTV6 COOLING SYSTEM


Alfa GTV6 Coolant Tank Level


  1. Set the heater control to max heat.
  2. Open the cooling system bleed screw.
  3. Fill the expansion tank with coolant. 
  4. Start the engine and run it until the thermostat starts to open and coolant begins to flow from the bleed screw. Immediately tighten the bleed screw once that happens. Protect yourself - hands, face, and arms - from hot coolant, and have a heavy towel handy to absorb the leaking coolant as you open the bleed screw.
  5. Turn the engine off, allow it to cool, and top off the expansion tank.
  6. Start the engine and check if the cooling fans cycle on and off at the appropriate temperature.

The above is the factory way to fill the system. However, you should be prepared for alternative scenarios like the one below.

If the coolant starts flowing out of the bleed screw appreciably while filling the system, tighten the bleed screw and squeeze the radiator hoses repeatedly to burb some air out of the system into the expansion tank. Keep an eye on the expansion tank level as you do this to see if it goes down. 

Next, open the bleed screw again and continue filling the system until full or the bleed screw leaks. Tighten the bleed screw, start the car, then slowly loosen the bleed screw while the engine is running and leave it open until coolant begins to flow. The cooling system will be under pressure when you open the bleed screw, so do it carefully and slowly. Don't be surprised if air/ coolant spurts out, so have a towel over the screw. Coolant gets hot quickly, so also be prepared for that. Tighten the bleed screw immediately, and you should be all bled out. Check the level when cold, and you are done.

Again note:
  1. Have protective gloves, clothing, face/eye protection, and absorbent towels on hand when doing this.
  2. Be careful when working around a running engine.
  3. Never open the bleed screw or expansion tank cap on a hot engine.
  4. Ensure your towel is not too large that it can get caught up in the water pump belt, etc. 
  5. Coolant isn't great on your timing belt or paint. Take precautions to keep it off. The manufacturer recommends rinsing the belt off with water if that happens.


Disclaimer: 
This is how I changed the thermostat on my Alfa GTV6, which is provided for informational and entertainment purposes. If you have any doubts about your ability to perform this work or have any issues, I recommend having it done by a professional. I am not responsible for any issues arriving from you reading this post. Use at your own risk.


Thursday, January 12, 2023

Alfa GTV6 US and Euro Ride Height Specs

Alfa GTV6 Front Image

 When the Alfa Romeo GTV6 hit American shores in 1981, the car we received was modified to meet DOT and EPA standards. Luckily, there weren't drastic differences between European and North American spec cars. . 

Some of the main differences between a North American and Euro-spec GTV6:

  • Impact absorbing bumpers
  • Standard Leather interior (1981-84) and air conditioning
  • US-approved sealed beam headlights and side markers
  • 85 mph speedometer (used on cars through 1983)
  • Catalytic converter with Lambda control and specific engine calibrations
  • Catalytic converter overheat and oxygen sensor replacement warning light
  • New ignition distributor with a different advance curve and added vacuum retard mechanism
  • Slightly less power: 154 hp @5500rpm vs. Euro's 158 hp @5600rpm / 151.9 lbs.Ft @3200 rpm vs. Euro's 156 lb.Ft @4000 rpm
  • Raised ride height to meet DOT headlight height standards

A common modification to US GTV6 models is lowering the front end height to European specifications or even lower. This can be "easily" done by adjusting the front torsion bars. I use quotations around "easily" because 40 years later, the torsion bars may be rusted or frozen in place and a bear to unseat.* Dealing with that is a story for another day.

How To Check Your GTV6's Ride Height

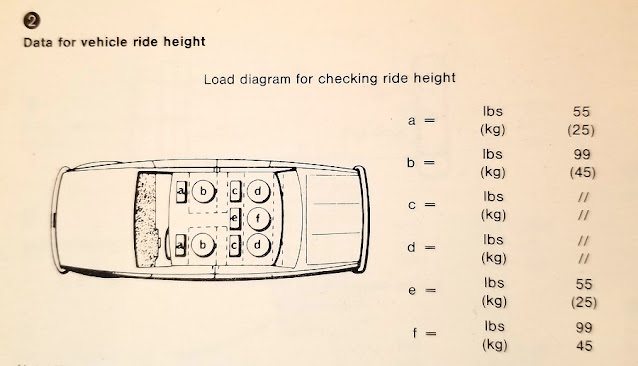
Below are the GTV6 ride height specifications if you want to check yours. These checks are done with stock tire sizes, pressures, and a specified weight of 210kg / 462 lbs added to your car in specific locations. This weight corresponds to three people that weigh 154 lbs each. I feel sorry for the person sitting in the back seat on the center storage tray!

Early GTV6 Rear Seats
US GTV6 models have a center tray between the rear seats. European cars that I have seen do not. If you have a European car that has the tray, feel free to let us know in the comments!

The manual tells you to disconnect the sway bar and shock absorbers front and rear to remove any of their influence on ride height. They also want you to loosen the Watts linkage bolts to the body. It is hard to say how many people do that, but it makes sense. Owning an older Italian car was never going to be easy.


GTV6 Load for Height

Above is the chart showing how to distribute the weight in the car for an accurate height check, but before you get too crazy, it just represents three people that weigh 70kg / 154lbs each. Note the rear passenger gets to sit in the middle of the seat! Also, make sure the car has a full tank of gas. 


GTV6 Front End Height


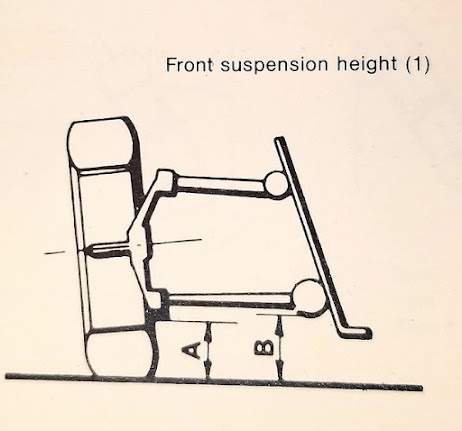
Once you have the weight loaded into your car, you measure the differences between the two locations.  Location "A" is at the bottom of the ball joint stud.  Location "B" is the bottom of the lower control arm mounting bracket.  Below are the specs:

1981 European Alfa GTV6 Front Ride Height**

  • B-A=44MM +/-5
up to 1983 European Alfa GTV6 Front Ride Height (revised)**
  • B-A=50MM +/-5mm

US Spec 1982 Alfa GTV6 Front Ride Height

  • B-A= 60MM +/-5

** Original 1981-82 European Inspection Specification Manual (publication date 1/81) states 44 mm ride height. The late manual for model years up to 1983 model year ( publication date 3/84) uses 50MM spec and states this manual replaces and supersedes all older manuals on the subject. Which measurement do you use? Taken at face value, the later manual is supposed to be the revised measurement. If you are new to older Alfas, get used to discrepancies and ambiguities like this.

Note: Left and Right side differences should not exceed 5mm.

GTV6 Rear End Height

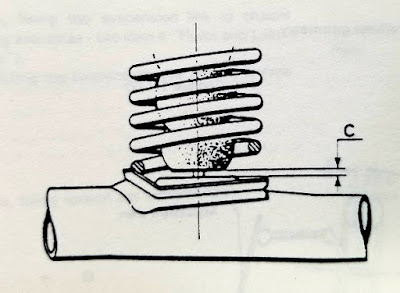
For the rear,  the measurement when loaded is the same for the US and European markets. The "C" measurement should be 34 mm +/- 5 mm.  It can be adjusted by inserting a shim in the upper spring seat.  At one time, shims sized 7,14 and 21 mm were available through your dealer. Now, you'll have to make them. An Alfa Romeo technical bulletin cautions to not use a shim larger than 21mm as coil binding may occur.

Okay, but I don't have three friends weighing 154 lbs each, and I've got other things to do. So how's this info going to help?

You can use the above information to plan your lowering target.

As you can see, the difference in height between a US and Euro car at the specified weight is nominally 10mm, but taking tolerances into account, it may be as much as 26mm. Interestingly, the original European 4-cylinder Alfetta models from the early 70s use the 39 to 44 mm spec. 

Keep in mind if you want to lower your car, there are some negatives. Be warned that the GTV6 is already prone to grounding on speed bumps, driveways, etc. If you run headers and lower your car, you will likely dent them. Also, the engine's beautifully finned oil sump becomes even more vulnerable. 

Lowering a GTV6 too much can result in excessive negative camber, necessitating modifying the lower control arm mounts to bring the car back to specs. In addition, the suspension geometry can be affected, diminishing the handling. Also, the car will be prone to constantly bottoming out on the bump stops, ruining the ride. And, of course, a wheel alignment should be done after any suspension work.

What Would I Do?

The Alfa GTV6 is already a good handling car, and as an Alfa engineer and racer once told me, few people can actually outdrive the standard car, so you'd be better off spending effort on improving your driving.  

Good advice, but I still like tweaking my cars.

So for my car, lowering 20 - 26 mm (about 3/4 to 1 inch) seems reasonable, considering the horrible New York roads I deal with and my low-hanging headers. It is visually noticeable and even more important, brings the suspension back near its original European specifications.  

GTV6 Torsion Bar
*The front GTV6 torsion bars have 35 splines on the front and 34 splines on the rear. The different number of splines on the ends allows for 1.5 mm adjustment, corresponding to one spline movement. Working on automotive suspension systems and dealing with springs / torsion bars can be extremely dangerous. While the procedure of adjusting the ride height seems easy, I recommend professionals or experienced people do this work. Always be safe and aware of all risks before proceeding.


If that is not low enough for you, adjusting the height to where the lower control arms are parallel to the ground with a normal load is popular in the GTV6 community. 

Only you know what is right for you, so do your own research and checking.  As always, YMMV.


Disclaimer: The above is provided for informational and entertainment purposes only. If you have any doubts on you ability to perform this work or have any issues, I recommend having it done by a professional. I am not responsible for any issues arriving from you reading this post. Use at your own risk.


Reference:
Alfa Romeo Inspection Specifications European Manual dated 1/81, 2/81 and 3/84
Alfa Romeo Inspection Specifications North American Manual dated 4/81
Alfa Romeo Alfetta Workshop Manual dated 3/78

-----------------------------------

European GTV6 Ride Hight Specs, US GTV6 Ride Height Specs, Difference between US and Euro GTV6 Models


Tuesday, December 6, 2022

Certificate of Origin Alfa Romeo GTV6


Alfa Romeo Certificate of Origin


Alfa Romeo offers a service where they can send you a Certificate of Origin for your car. The Alfa Romeo Certificate of Origin documents when your vehicle was made and other information. Some may consider it a neat novelty to have, but there is also a practical side where it can help during a restoration and may even add value when selling your car.  


Alfa Romeo offers this service for all their vehicles. However, the information varies depending on the model, year of manufacture, and sales market. For my 1982 GTV6, production date, interior, and exterior colors. An engine number confirmation was available if you provided them with the number stamped on your block. Some cars may have more or less information.

Alfa GTV6 Engine Number

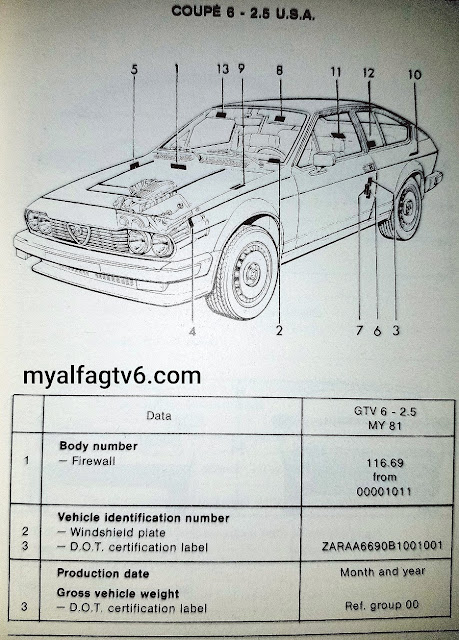
To get a certificate, you'll need your chassis number. Note, this is not the Vehicle Identification Number (VIN). On a GTV6, the chassis number is stamped on the firewall under the wiper motor. 

The Alfa Romeo GTV6 Chassis Number or Body Number location is shown in the image below. The Vehicle Identification Number (VIN) is the plate seen through the windshield.

Alfa GTV6 Chassis Numbers

Once you have the Chassis Number, contact Alfa Romeo, they will reply with what information is available and give you the cost of the service. At the moment, Alfa Romeo charges 120€ for the service. The breakdown is below (note the tax. Ouch!).

  • Certificato di Origine ALFA ROMEO - 98.36€
  • Tax - 21.64 €

Go to the Alfa Romeo Museum's Certificate of Origin's link:

Alfa Romeo Certificate of Origin Form

Here's their direct email address.

centrodocumentazione@museoalfaromeo.com

The Certificate of Origin is printed on fancy, high-quality paper, and is sent only in the Italian language. A preview will be emailed in English.

Below is the email I was sent:

--------------------------------------

Dear Mr Vitale,

Please find attached the preview with the information related to the chassis number you have requested. 

Kindly note that we will send the document, printed on high-quality paper, to the address provided with the confirmation of the quote.  

Thank you and kind regard


From the production registers held in the Centro Documentazione Alfa Romeo, the chassis number ZAR 11669000002475 originally corresponds to: 

  • Alfa Romeo GTV 6 2.5 USA 
  • Production date: 1981, November 18th 
  • Exterior color: Nero metallizzato 
  • Interior: Pelle color blu 
  • Note: Engine number AR A50820 corresponds to the engine first mounted in the vehicle.
Alfa Romeo Museum Address

Viale Alfa Romeo, 20020 Arese (MI) Italy
Tel.+39 02 444 255 11, info@museoalfaromeo.com, www.museoalfaromeo.com
FCA Partecipazioni S.p.A. a socio unico - Sede: via Plava 80 - Loft 1, 10135 Torino; Capitale sociale Euro 55.989.946,00 i.v.;
Reg. Imp. Torino, Cod. Fisc. e P.IVA 01053960017; REA di Torino 488477;
Direzione e coordinamento ex art. 2497 c.c.: Stellantis N.V.

------------------------------

So a nice thing to have and maybe a splurge, but also an excellent way to document your car's originality and equipment.


Video: Alfa Romeo Museum YouTube Channel

Saturday, November 5, 2022

GTV6 Green Distributor Primary Wire


Alfa GTV6 Distributor Primary Connector

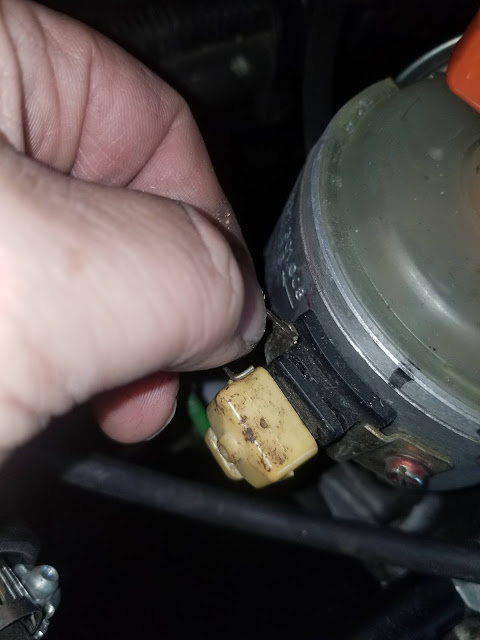
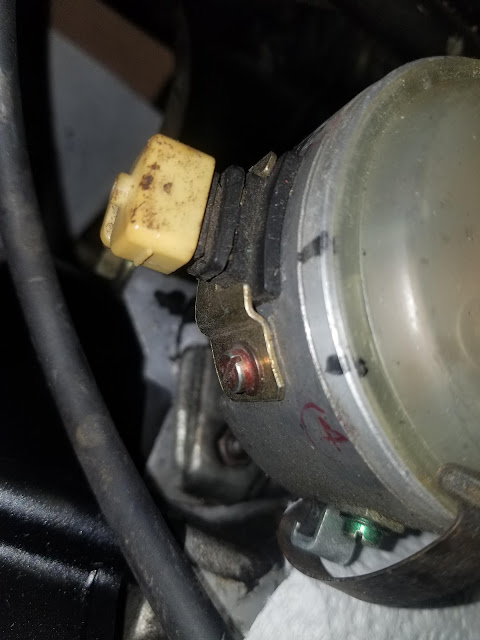
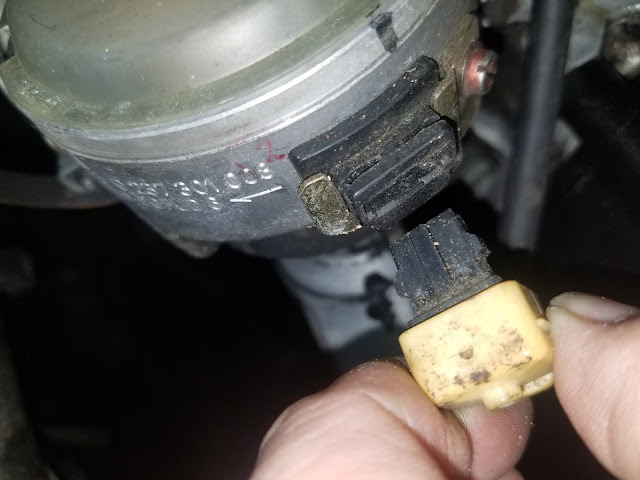
The Alfa GTV6 Distributor Primary Lead Wire is plugged into the side of the distributor housing with a special plug.  Don't just yank this plug out! There is a wire spring clip that needs to be carefully removed. The spring clip is similar to the ones holding in the temperature sensors and injectors. 

Be careful when unplugging this connector because it can be delicate and brittle after all these years.  One of the larger issues with a classic car like the GTV6 is trying to find uncommon, but important pieces like this, so tread lightly!

Note, I have an early car with a 2-wire connector.  Later cars using the Bosch EZ-L digital electronic ignition system have a 3-wire connector.

Alfa GTV6 Distributor Connector

My pick is pointing to the wire clip that needs to be removed. This could be covered with grime, so you may have to look closely for it.

GTV6 Distributor Connector

You can see me holding this U-shaped wire clip.  It fits into the two grooves in the black connector attached to the distributor.

Alfa GTV6 Distributor Primary Wire

 
Hard to see, but the wire clip is installed. A little bit of dirt can make this difficult to see.


Alfa GTV6 Distributor Primary Connector

This is the signal or primary wire unplugged from the distributor.  The tabs on either side get locked in by the wire clip. A good tip I use is to place some white paper towels underneath something I am working on so if you drop a tiny clip you'll find it and it won't fall into the engine compartment never to be seen.


Thursday, October 27, 2022

Alfa GTV6 Coolant Fan Switch

 Alfa GTV6 Coolant Fan Switch

The Alfa Romeo GTV6 uses a coolant fan switch in the radiator to turn the fans on and off.  This 2-prong switch is located on the driver's side of the radiator, just above the lower radiator hose. When the temperature of the coolant leaving the radiator reaches a set point, the contacts close in the switch and fans turn on.


Alfa GTV6 Radiator Fan Switch

The thermostat on an Alfa GTV6 begins to open up at 176°F (80° C).  The coolant fan switch in the radiator turns the fans on at 183.2° - 190.4 ° F (84-88° C).  A coolant temperature sensor in the thermostat housing controls the temperature gauge in the car and turns on the overheat warning light at 221°F (105°C). 


Alfa GTV6 fan switch washers

My Alfa GTV6's radiator coolant fan switch is marked to turn on at 187° F (86° C)  and turn off at 169°F (76°C). When you install this switch, use a new 22MM aluminum sealing washer. By the way, this is the same size as the GTV6's oil drain plug washer, so you may have one. The wrench size is 1 1/8 inch or 29mm. Alfa Romeo also recommends using anti-seize on the threads to help sealing.

Alfa Romeo GTV6 Radiator Cooling Fan Switch Specs

  • Temperature: 183.2 - 190.4 ° F (84-88° C)
  • Tightening Torque: 14.5 - 18.1 ft.lb (20 - 25 Nm)
  • Wrench Size: 29mm or 1 1/8 inch
  • Thread Size: 22x1.5mm Thread size
  • Sealing Washer Size: 22MM Aluminum
  • Sealant: Anti-seize
  • Alfa Romeo Part Number: 60506988

The good news is this 2-prong switch is a common design and used by other car companies like Fiat, VW and Audi, so it is readily available. Note, you may have to modify your connector to use a non-original one. Also, be careful to match the temperature specifications. 

Click The Link Below to Read More:

Alfa Romeo Cooling System Specifications

Tuesday, October 25, 2022

Alfa GTV6 Timing Marks

Early USA GTV6 Timing Marks

The Alfa Romeo GTV6 is not an ordinary car, and some of its mechanical components have a bit of an enigma surrounding them. One of these features is the mysterious markings on the crankshaft pulley used for ignition and valve timing. It is essential to have a perfect understanding of these marks, or you can get into trouble, so stick around.

81-83 Alfa GTV6 Timing Marks

While most cars use numbers or hashmark either on the crankshaft pulley or timing cover to verify engine timing, the Alfa GTV6 uses a confusing bunch of letters. On top of that, depending on if you have a US or Euro-spec car, only some of these letters coincide. So if you don't realize you are using a Euro-car repair manual or a North American manual, you can get screwed up. Fear not; we'll help decipher these letters like a pro.

Alfa GTV6 Timing Marks Early USA

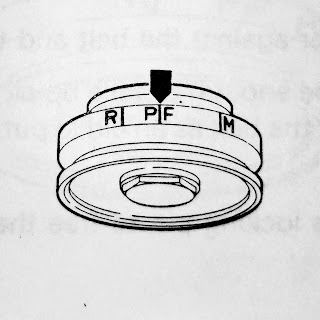
Looking at the crank pulley on a North American GTV6, you will see R, F, P, and M etched into the crank pulley. This differs from Euro-spec cars that just have P, F, and M. 

The letters correspond to the following Italian words:

  • R - Ritardato or Retarded
  • F - Fisso or Fixed
  • P - Punto or Point/Dot
  • M -Massimo or Maximum

Above the crank pulley, there will be a pointer on the front engine flange that you line up to these letters.

Early Alfa GTV6 Timing Mark


Alfa GTV6 TDC Timing Mark

On a 1981 -mid-1983 North American GTV6, the marks correspond to:

  • R- 5° +/- 1° ATDC (After Top Dead Center)
  • F and P - TDC (Top Dead Center)
  • M - 26-29° BTDC (Before Top Dead Center)


 Early US GTV6 Timing Spec

Base ignition timing at the 800 -1000 rpm idle with the distributor vacuum line connected should be at the R mark (or 5° +/- 1° ATDC). Note, with the vacuum hose disconnected, timing will advance to the P (TDC) mark.

Timing at 5,000 with the distributor vacuum line disconnected should be at the M mark ( 26-29° BTDC).


Late Alfa GTV6 Timing Marks


Late GTV6 Timing Marks

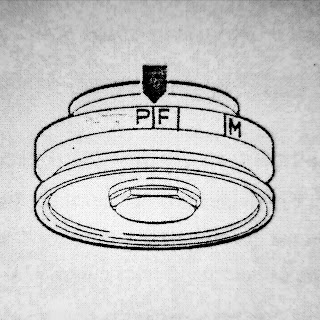
On some late-1983* and newer North American GTV6, the marks correspond to:

  • P - TDC (Top Dead Center)
  • F- 2° BTDC (Before Top Dead Center)

Cars from about late-83* and up use the Bosch EZ-L digital electronic ignition system where you just set initial advance. The distributor's internal centrifugal advance mechanism is eliminated and combined within the electronic control unit. In addition, a vacuum advance capsule boosts part-throttle performance and fuel economy during part throttle operation. 

Initial ignition timing at the  950 +/- 50 rpm idle speed with vacuum hose disconnected is 2° BTDC. 


European Alfa GTV6 Timing

European Alfa GTV6 Timing Marks

  • P - TDC (Top Dead Center)
  • F-  7° - 10° BTDC (Before Top Dead Center)
  • M - 28-31 ° BTDC (Before Top Dead Center)


The European GTV6 ignition system is similar to the early North American car's setup. Different initial timing, advance curve, and the elimination of vacuum retard are the main differences.


Euro GTV6 Base Timing


Base ignition timing at the 850 -1000 rpm idle with the distributor vacuum line disconnected should be at the F mark (or 7° - 10° BTDC). 


Euro GTV6 Max Timing Mark


Timing at 5,000 rpm with the distributor vacuum line disconnected should be at the M mark ( 28-31 ° BTDC).


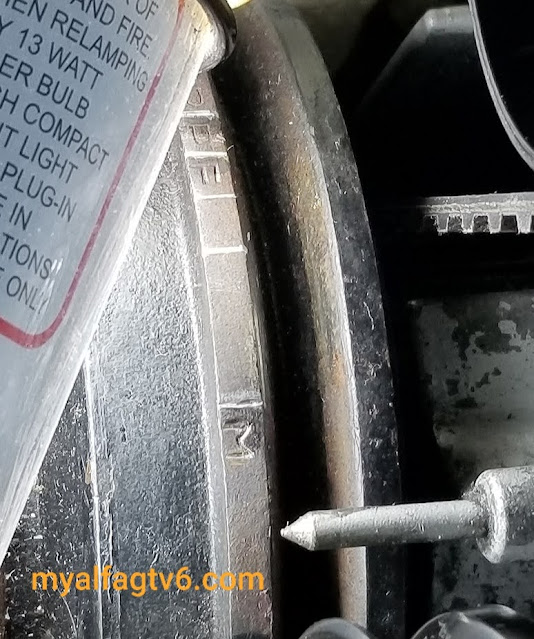
Alfa GTV6 Top Dead Center Mark

Alfa GTV6 TDC Timing Mark


  • P - TDC (Top Dead Center)

The P mark on the crank pulley corresponds to TDC on all GTV6 models. 


Timing Mark Degreeing the GTV6 Crank Pulley

My Alfa GTV6 Timing Marks

If you own an Alfa Romeo, you likely enjoy modifying and trying to improve its performance. If you are doing an engine mod, accurately knowing the crankshaft degrees during an event like ignition, valve opening/closing, etc., is vital. With the marks you have on the crank pulley, you can figure out the distance of each degree and mark them off. For example, on my North American 1982 GTV6, every degree is approximately .040" or 1.016mm apart. 

Alfa GTV6 Crank Markings

I have a European distributor installed in my car and want to time my engine at 10° BTDC. I simply measured the distance between P and R (equals 5°) on my crank pulley and came up with approximately 5mm. So, I placed 2 marks 5mm apart BTDC, corresponding to 5° and 10°. Simple. You could do that all around the crank if you desire.


* Documentation shows 1983 50 State (California) emission compliant GTV6 models came with the late ignition systems.

Wednesday, October 19, 2022

Alfa GTV6 Cooling System Specs


Alfa GTV6 Cooling System Diagram
1 Thermostatic valve, 2 Water thermometer sender and thermal switch for coolant temperature warning light, 3 Heater, 4 Heater valve, 5 Heater valve control, 6 Coolant temperature warning light, 7 Coolant thermometer, 8 Radiator, 9 Electric fan, 10 Electric fan thermal switch, 11 Pump, 12 Header tank, 13 Header tank cap, 14 Electric fan relay

When you are doing work on the cooling system of your Alfa GTV6, having the specs come in handy.  To save you time, here are some of the ones I've needed to find in the middle of a job. .

You will note that there is an Alfa Romeo recommended a coolant system sealant.  In the old days, OEM manufacturers would add a coolant sealant to help seal the system on brand new cars!


Alfa GTV6 Cooling System Specs

GTV6 Coolant Capacity: 

  • 3.2 gallons / 12 liters

GTV6 Radiator Testing Pressure

  • 15.6 psi (1.1 bar)

GTV6 Radiator Cap Pressure Rating

  • 12.8-15.64 psi (.88- 1.08 bar)

GTV6 Thermostat Temperature

  • initial opening: 180-185°F (81-85°C)
  • fully open: 200°F (95°C)

GTV6 Radiator Fan Cut-In Temperature

  • 185-190°F (84-88°C)

GTV6 Coolant System Tightening Torques

 Water Pump Retaining Bolts

  • 6-6.9 lb/ft (8.1-9.3Nm)

Water Temperature Transmitter on thermostat housing

  • 14.4-18 lb/ft (20-25 Nm)

Engine Temperature Sensor on thermostat housing

  • 10.8lb/ft (15 Nm)

Thermo-time Switch on thermostat housing

  • 21.6lb/ft (29 Nm)

Radiator Cooling Fan Switch

  • 14.4-18 lb/ft (20-25 Nm)


Anti-seize Thread Sealants:  

  • Water Temp Transmitter, Engine Temperature Sensor, Thermo-time Switch threads  on                       thermostat housing.
  • Threads on Cooling Fan Switch in Radiator

Cooling System Sealant

  • Arexons Sealing Powder 4.5 oz (12grams)
  • Alumaseal Powder


Tag:  

Alfa Romeo GTV6 Cooling System Diagram

Source: Alfa Romeo Service Manual, 1981 NA GTV6 Technical Specifications

Welcome to My GTV6 Website


1982 Alfa GTV6

Welcome to my Alfa GTV6 website! This place is dedicated to my Alfa Romeo GTV6 and helping others keep their GTV6 on the road. I've owned my GTV6 since 1986, but I parked it 20 years ago when my son was born. So now the time has come to start enjoying my car again. But time hasn't been too kind, so follow along as I get my car road worthy again. We'll have plenty of tech and info to help you, too!

Thanks for visiting!


Chris


Cookies and Privacy Policy


----Cookie and Privacy Policy for MyAlfaGTV6.com----


At myalfagtv6.com, we recognize that privacy of your personal information is important. Here is information on what types of personal information we receive and collect when you use and visit myalfagtv6.com, and how we safeguard your information. We never sell your personal information to third parties.

Log Files
As with most other websites, we collect and use the data contained in log files. The information in the log files include your IP (internet protocol) address, your ISP (internet service provider, such as AOL or Shaw Cable), the browser you used to visit our site (such as Internet Explorer or Firefox), the time you visited our site and which pages you visited throughout our site.

Cookies and Web Beacons
We do use cookies to store information, such as your personal preferences when you visit our site. This could include only showing you a popup once in your visit, or the ability to login to some of our features, such as forums.

We also use third party advertisements and/or affiliate programs on myalfagtv6.com to support our site. Some of these advertisers may use technology such as cookies and web beacons when they advertise on our site, which will also send these advertisers (such as Google through the Google AdSense program) information including your IP address, your ISP , the browser you used to visit our site, and in some cases, whether you have Flash installed. This is generally used for geotargeting purposes (showing New York real estate ads to someone in New York, for example) or showing certain ads based on specific sites visited (such as showing cooking ads to someone who frequents cooking sites).

DoubleClick DART cookies
We also may use DART cookies for ad serving through Google’s DoubleClick, which places a cookie on your computer when you are browsing the web and visit a site using DoubleClick advertising (including some Google AdSense advertisements). This cookie is used to serve ads specific to you and your interests (”interest based targeting”). The ads served will be targeted based on your previous browsing history (For example, if you have been viewing sites about visiting Las Vegas, you may see Las Vegas hotel advertisements when viewing a non-related site, such as on a site about hockey). DART uses “non personally identifiable information”. It does NOT track personal information about you, such as your name, email address, physical address, telephone number, social security numbers, bank account numbers or credit card numbers. You can opt-out of this ad serving on all sites using this advertising by visiting:

https://www.google.com/settings/u/0/ads/authenticatedx

You can choose to disable or selectively turn off our cookies or third-party cookies in your browser settings, or by managing preferences in programs such as Norton Internet Security. However, this can affect how you are able to interact with our site as well as other websites. This could include the inability to login to services or programs, such as logging into forums or accounts.

Deleting cookies does not mean you are permanently opted out of any advertising program. Unless you have settings that disallow cookies, the next time you visit a site running the advertisements, a new cookie will be added.

You can read about Google's Privacy Policies for all of their companies here:


Statcounter

StatCounter is a web analytics service used to track activity on this websites. These stats help us understand how people interact with this site and helps us to improve its design and functionality so we can offer a better online experience to our users. If you visit a website which uses the StatCounter service, a 3rd pary StatCounter analytics cookie (called "is_unique") will usually be placed in your browser. This cookie is used only to determine whether you are a first-time or returning visitor and to estimate unique visits to the site. No personal information is stored in the cookie.

In summary, a StatCounter analytics cookie may be placed in your browser in two different ways:

  • You visit the StatCounter website or
  • You visit a website which uses the StatCounter service (i.e. you do not have to visit the StatCounter site in order to find a StatCounter analytics cookie in your browser)
  • You may set your browser to refuse/accept the 3rd party StatCounter analytics cookie by going to the site below:

http://statcounter.com/about/set-refusal-cookie/


Google Analytics

Google Analytics is a web analysis service provided by Google Inc. (“Google”) and through use of cookies, collects information anonymously. This data may include your IP address, operating system and browser type for system administration and in order to create reports. Cookies contain information that is transferred to your computer’s hard drive. These cookies are used to store information, such as the time that the current visit occurred, whether the visitor has been to the site before and what site referred the visitor to the web page. This statistical data is used to help understand how visitors engage with this website. It does not identify any individuals and Google will not associate your IP address with any other data held by Google.

You can opt out of Google Analytics without affecting how you visit this site – for more information on opting out of being tracked by Google Analytics across all websites you use, visit this Google page:

https://tools.google.com/dlpage/gaoptout


AdSense Privacy Policy Provided by


If you have any questions, please contact me.